Telehealth Raspberry Pi Tutorial
Aim: Build a remote video monitoring system that allows a patient to take and send snapshots to a caretaker
Estimated Time: 90 minutes
Skill Building: raspberry pi, python
Learning Objectives: learn to build a prototype of a remote monitoring system
Tutorial Outline


To get started building your telehealth system, you will need the following materials:
- 1 Raspberry Pi 3
- 2 Female/Male Jumper Wires
- 1 Button
- 1 Breadboard
- 1 Raspberry Pi Camera Board
- 1 HDMI Cable
- 1 HDMI Display
- 1 USB Keyboard
- 1 USB Mouse
- 1 microSD Card + Adapter
- 1 microUSB Wall Charger
Getting to the know the Raspberry Pi 3:
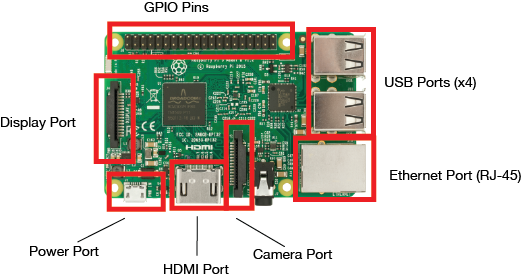

2.1 Plug in the USB mouse and keyboard to your Raspberry Pi. These can be either wired or wireless USB devices.

2.2 Using the HDMI cable, connect the HDMI display to the RPi via the on-board HDMI port.

2.3 Lift/unlatch the white/black tab for the camera port on the RPi. Then insert the camera ribbon cable such that the blue tape is facing away from the HDMI port. Lock the camera ribbon cable into place by pressing down on the white/black tab.


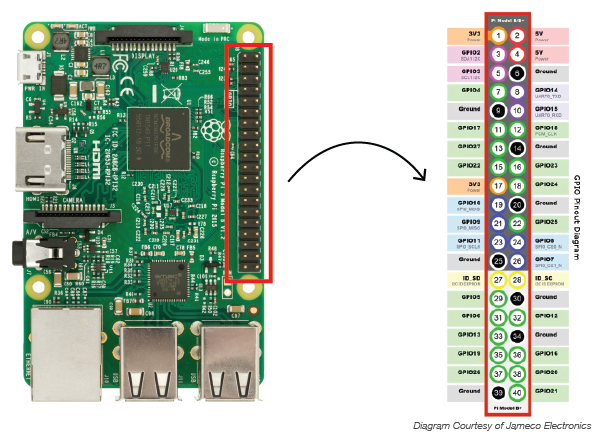
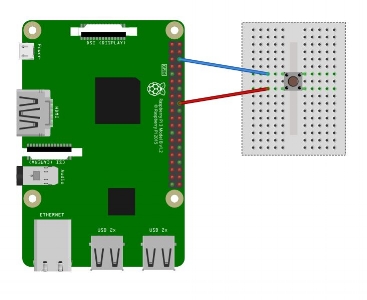
2.4 The button will be used to trigger a snapshot on the camera. Connect the button to the RPi by using pin 6 (Ground) and pin 12 (GPIO18). For this tutorial, we use female/male jumper wires and a breadboard to wire the button directly to the RPi. There are a number of ways to wire to these pins, including: a) soldering a button (or similar switch) directly to the pin instead of using jumper wires (this provides a more durable, but permanent connection) and b) using a RPi Cobbler Breakout board (more versatile).


3.1 If you have a MakerHealth kit or a pre-loaded microSD card, you can skip to step 3.3! If not, go to: https://www.raspberrypi.org/downloads/. Here, you will need to click to download NOOBs, which contains an installer for the operating system that will run the Raspberry Pi.
3.2 Once NOOBs has been downloaded, transfer it to a microSD card. This can be done with a microSD card adapter inserted directly into your computer or via an SD card reader for your computer. Extract the files from the zipped NOOBs folder you download. Drag the extracted files from your computer to the microSD card.
3.3 Insert the microSD card into the Raspberry Pi.
3.4 Now it's time to power up the RPi. Plug one end of the microUSB wall charger into a wall outlet, and the other into the power port on the Rpi.

3.5 Once the Raspberry Pi boots up, select Raspian with PIXEL and then click Install.

3.6 Once Rasbian or Debian has been installed, the Linux desktop will open up.
3.7 Make sure you are connected to the internet. This can either be done via ethernet or wi-fi. Navigate to the network connections icon in the top right corner to confirm you are connected, or create a new connection if you are not.

3.8 In order to allow the Raspberry Pi to work with Gmail, you will need to install three packages. Open the terminal and run the following commands
sudo apt-get install python-pip python2.7-dev
sudo easy_install -U distribute
sudo pip install feedparser

If you have the pre-loaded microSD card from MakerHealth, you can skip Section 4!
4.1 To clone the Telehealth script to your Raspberry Pi, first open the terminal. Within the terminal, type: git clone https://github.com/makerhealth/TeleHealth-RemoteSend


4.2 Once cloned, click on the File Manager in the top left corner, inside the main /home/pi/ folder you will see a folder entitled TeleHealth-RemoteSend. Drag this folder to the desktop to make it easier to access


5.1 Before editing and running the python script, you’ll need to allow your gmail to connect to your RPi
5.2 The Telehealth script should now exist on the desktop within the folder: Telehealth-RemoteSend. Use the terminal to navigate to the folder containing the python script by typing cd Telehealth-RemoteSend

5.3 Once in the folder, to access the file in order to edit it, type the command: sudo nano Telehealth-RemoteSend.py in the terminal. The file containing the python script will open and be editable.

5.4 Edit lines 15 and 16 to include who is sending the file and who you are sending the file to. The from address will need to be a Gmail address (the one you gave access to above), while the to address can be any email address.
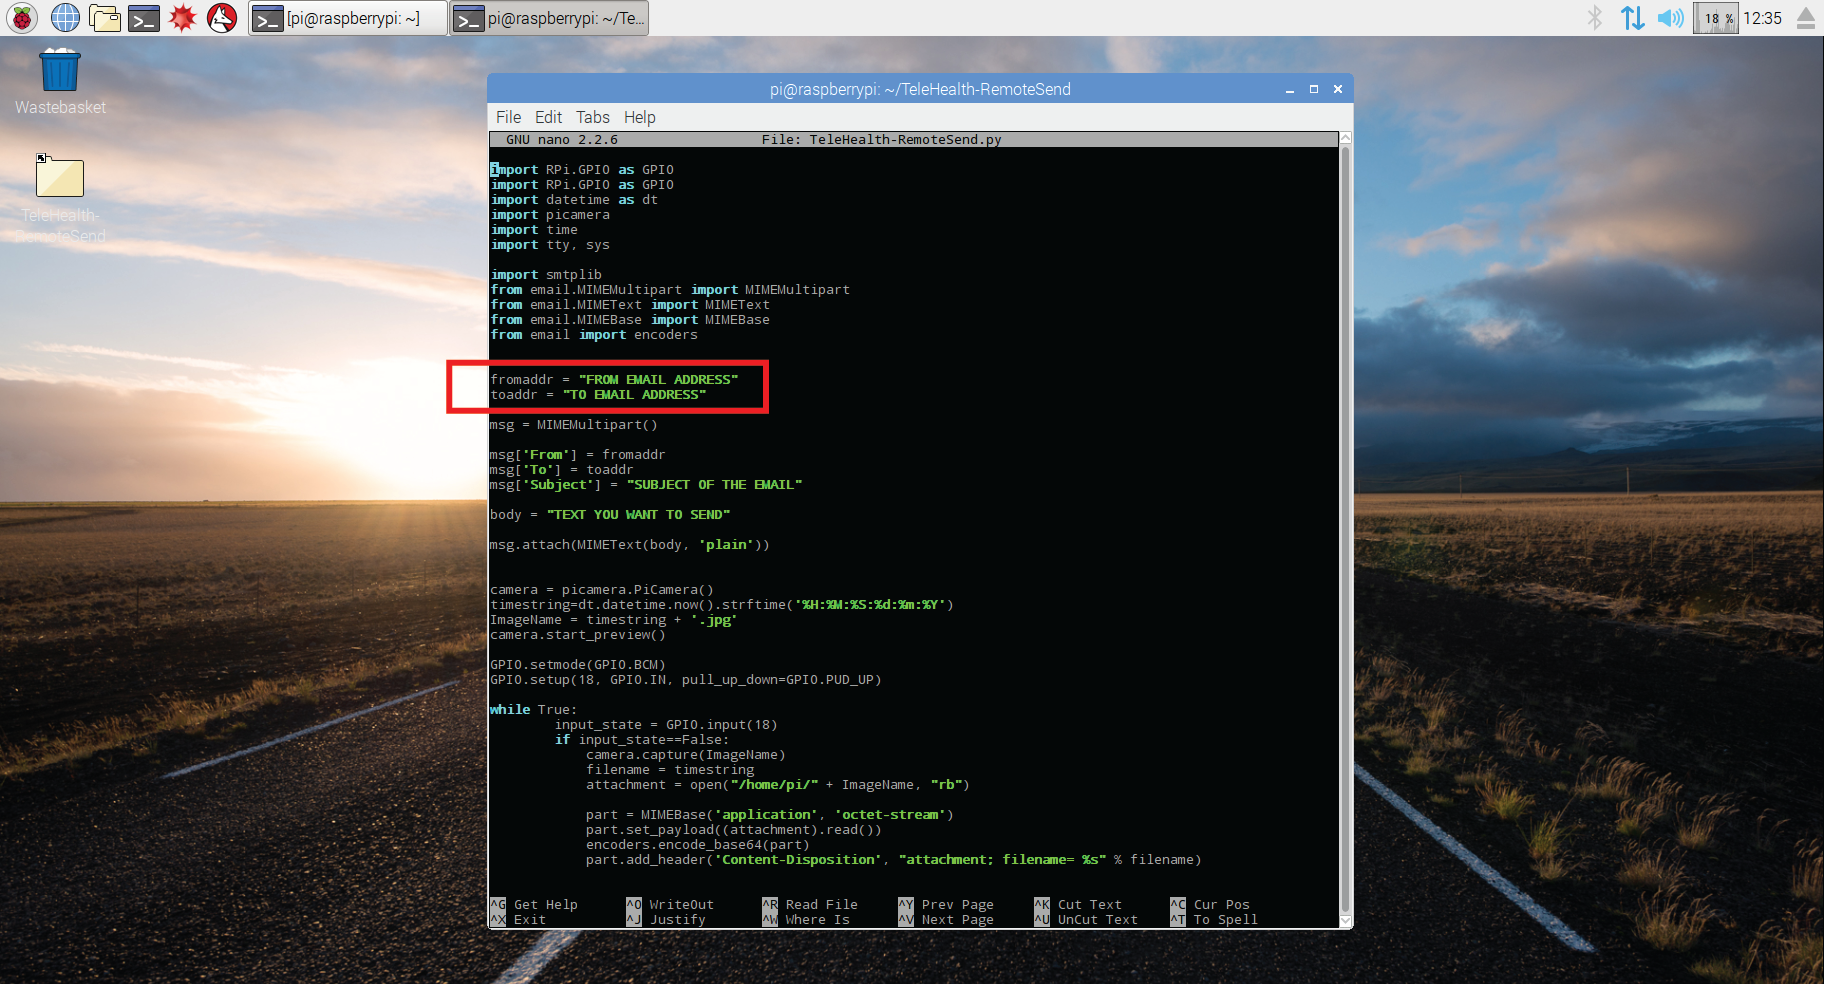
5.5 Edit password to your Gmail (the one input on line 15) on line 53. This will give the script the ability to send an email from your email address.

5.6 Edit line 22 to change the subject of the email for all emails being sent

5.7 Edit line 24 to change the body text of the email for all pictures being sent

5.8 Hold ‘Ctrl + x’ when finished to navigate to the options menu
5.9 Press ‘y’ and ‘Enter’ to save the changes.

6.1 Check the path in the terminal, if you are not currently in the correct folder, navigate to the folder containing the python script by typing cd Telehealth-RemoteSend, then type sudo python Teleheatlh-RemoteSend.py to start the script. A screen will pop-up with the video feed from the camera board.

6.2 If you receive an error asking to enable the camera, follow the next steps, if not, skip to 6.6
6.3 Open a new terminal and enter the command sudo raspi-config
6.4 Arrow down to Option 5: Interfacing Options and hit Enter. Select Option P1: Camera, then select Yes
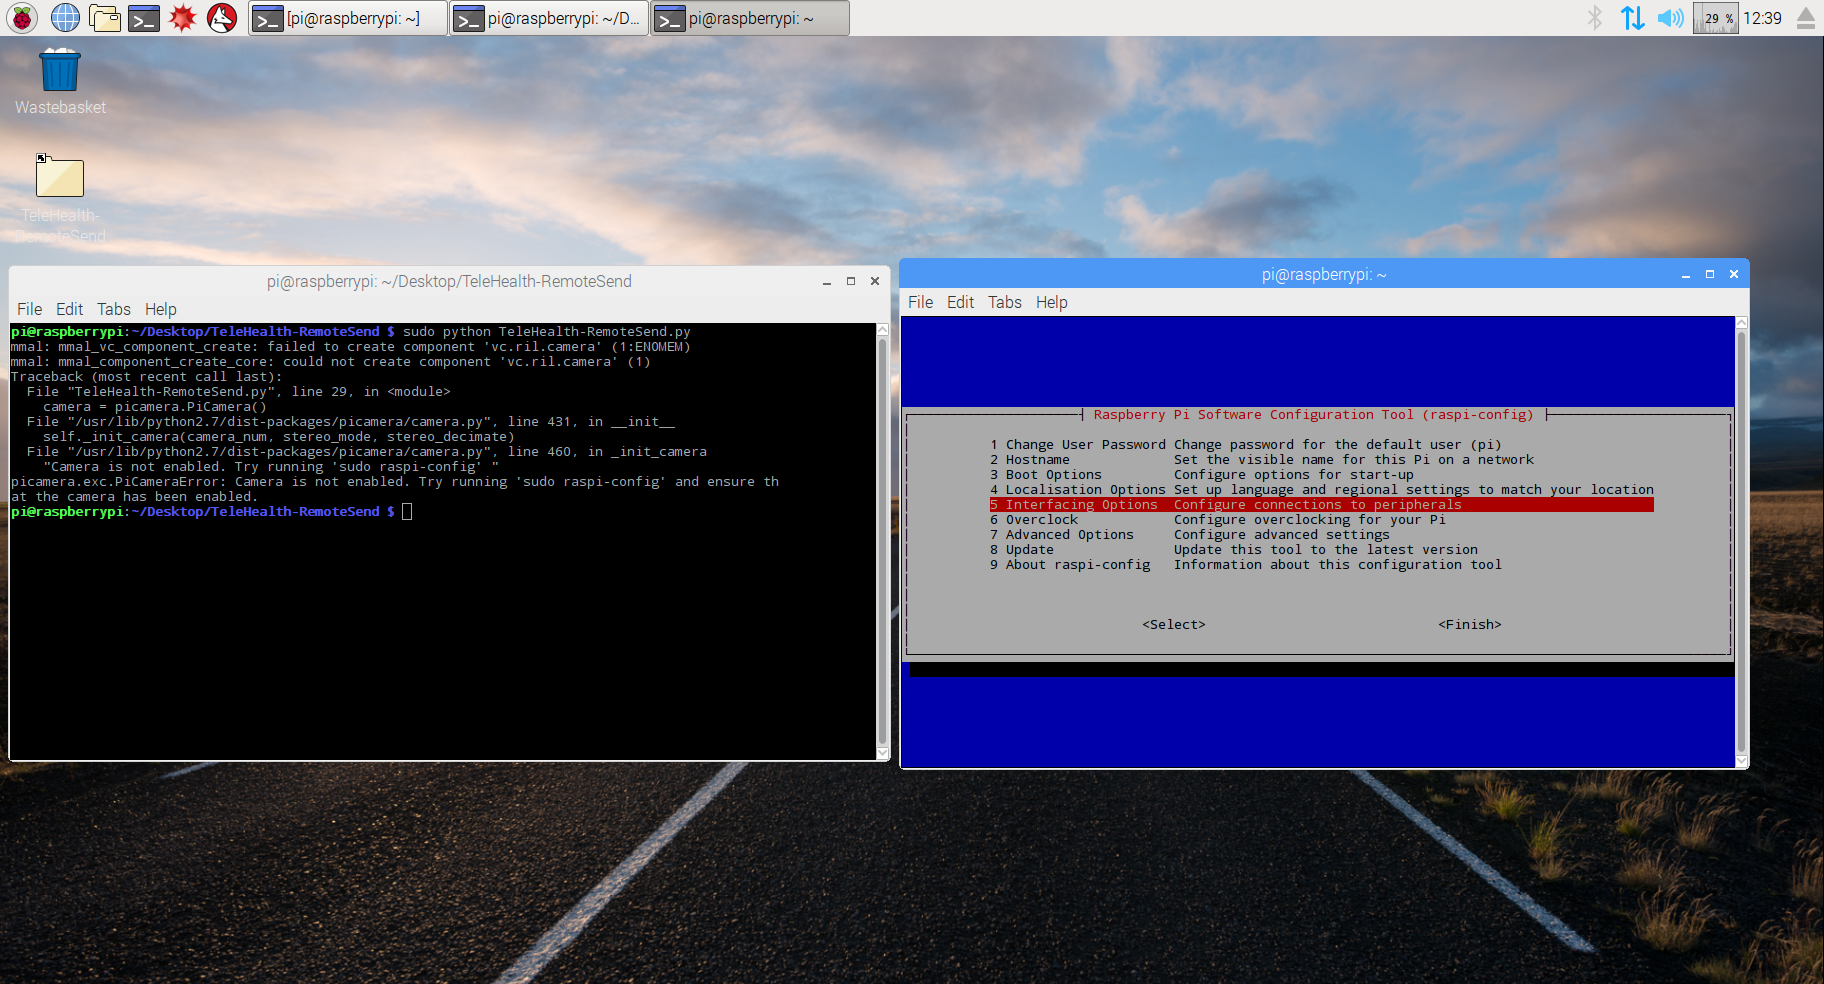

6.5 Hit Yes to enable the camera and then Yes again to reboot the Raspberry Pi


6.6 Press the button to take a snapshot and send it via email. Once the button is pressed, you will see the screen "freeze" for a second to confirm the picture was taken. Confirm that the script is running properly by checking if an email was received at the address input in line 16.
6.7 At any point while the script is running, hold down 'Ctrl + c' to exit back to the desktop.
