App Inventor Tutorial
Aim: Create a Patient Pain Scale Survey in an Android Mobile Phone App
Estimated time: 90 minutes
Technical skill building*: android mobile app development, wire frame sketching *no prior app development knowledge needed
Materials & tools: computer, internet access (optional, android phone and USB cable)
Learning Objectives: learn to build a functional prototype of your own survey app
Tutorial Outline


There are two basic questions to answer before diving into the technical steps of the tutorial:
1. Who will use your app?
For example: patients (pediatric, geriatric, rehabilitation, etc.), family members, nurses, or other allied health professionals
2. In what setting will they use your app?
For example: in the hospital at the bedside, in an ED waiting area, in an ambulatory care waiting area, in a school clinic, or at home
With the user and context details in mind, think of four survey questions you would like to ask in the survey (three multiple choice and one open text). You'll use the user details, context and survey questions to build your base app. Throughout the tutorial, you'll have the opportunity to note down questions and ideas for added features at each stage. After your base app is up and running you can dive back into these additional details and features to extend the capabilities and customize your mobile phone app.

This section jumps into App Inventor at the beginning, how to start a new project. We'll then walk through the App Inventor environment and explore the different modes that you will work in: designer mode (to design the user interface) and blocks mode (to program the logic and screen connections behind the components).
2.1 This is a view of the main project page. Here you'll see a list of your App Inventor projects. To start a new project, click on Start New Project.


2.2 Give your project a name

2.3 This is the App Inventor Project Workspace. In the top right corner, you'll see that you can toggle between Designer Mode and Blocks Mode. Currently, the screen is in Designer Mode. Designer Mode is where you will design what your app will look like on the phone screen (the user interface). You do this by manipulating the various GUIs (Graphical User Interfaces) that you see on the left hand toolbar under Palette.
Blocks Mode is where you will assign functions and logic to the GUIs. This is what allows you to control the various buttons, text boxes, etc. that you will include in your app. On the right hand side is the Properties toolbar. In the properties toolbar, you will be able to change the position and look of each component you add to your app. In the middle of the workspace is the viewer. In Designer Mode, the viewer previews what your app screen will look like. In Blocks Mode, the middle portion is where you will include and manipulate the various code blocks. Lastly, to the right of the viewer you will see the Components organizer. This is where you will be able to keep track and organize all of the components you add to your app.


In the Design Mode, we'll now design the welcome screen that the survey user first sees when opening the app. This includes a title and a button (START). You'll have the option to sketch ideas for additional welcome screen features you would like to include in later iterations.
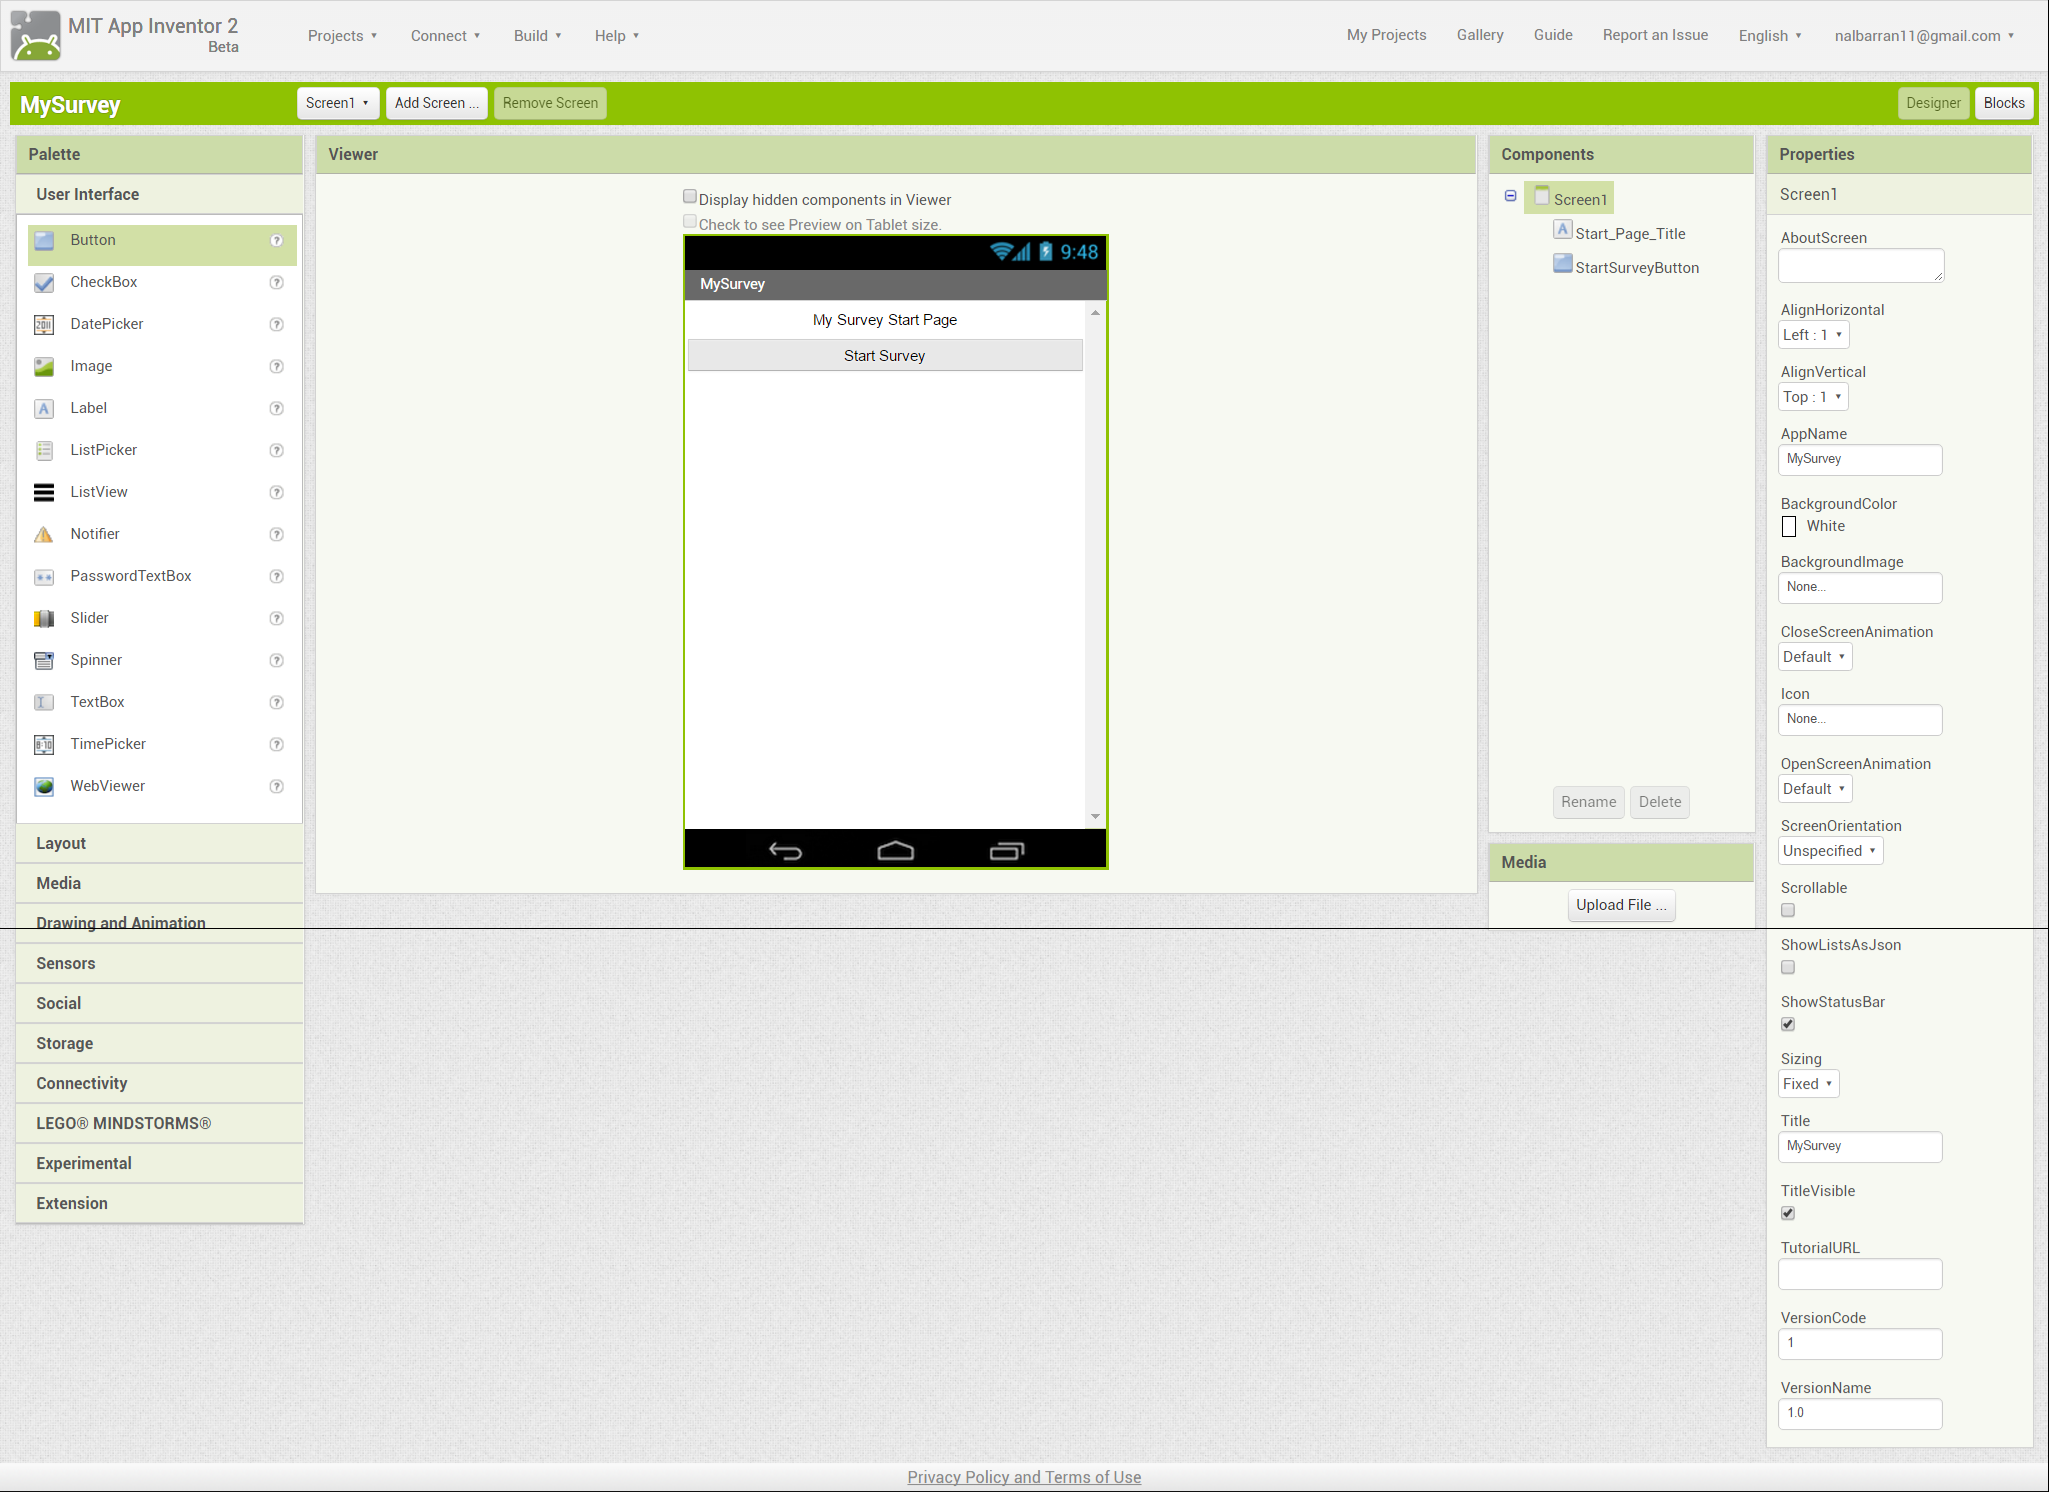
3.1 As you build your app, you will have different screens as you design buttons and components that navigate to other parts of your app. Right above the viewer is where you can organize your various screens including: Add a screen, Remove a screen, and a drop-down menu of all of the screens. First, let's change the properties for our main screen, Screen 1. In the right hand side, rename Screen 1 (your main/welcome screen). You'll see the name updated in the top left corner of the screen in the viewer.

3.2. Now, add your first two components to the screen. As this is the starting screen for your survey app, you'll want to add a Label (the main header on the welcome screen) and a Button (to start the survey).

3.3 Just as you did in Step 3.1 for Screen 1, you'll want to change the properties for the Label. Select Label1 in the components organizer. In the right hand toolbar, add My Survey Start Page under the field labeled "text". You can change the position of the Label under "text alignment" and the width of the box containing the text under "width".


3.4. Repeat Step 3.3 for Button1. Change the text to Start Survey.

3.5 As you add components, it's important to make sure they are organized and named in a way that makes them quick and easy to access. In the components organizer, rename Button1 and Label1. First, click on the name of the component, then Rename.

3.6 On the worksheet, note additional features you would like to add to the welcome screen in future versions of your app. Some ideas: Add a description or an image to the screen. If you are managing more than one survey you could include buttons for each survey at the welcome screen. If you are running a study you could include a button that links to a digital consent form for the subject.

We'll now jump into Blocks Mode for the first time to add logic to the button and text that you just created for the welcome screen in Design Mode. The following steps will create the logic link between the welcome screen button and survey screen.
4.1 In the top right corner, switch your viewer to Blocks Mode. In Blocks Mode, the left hand toolbar contains the different code blocks that we will use to give our components function.

4.2 On the left hand side, click on StartSurveyButton. A scroll down menu will appear with all of the code blocks that are associated with your StartSurveyButton. As you see in the first yellow blocks, there is the logic statement "when ____ happens, do _______". In the case of the top block, when StartSurveyButton (the button you added to Screen1 in designer mode) .Click (is clicked) do _________.

4.3 Drag that code block into the viewer area.

4.4 Now we will tell what our StartSurveyButton what to do when it is clicked. When the start button is clicked in our main page, we want the app to take us to a new screen so that we can start the survey. Go to the yellow Control option in the top left. Scroll down until you get to the command open another screen. Drag this into the first code block in the empty space next to do.

4.5 In order to tell the StartSurveyButton which screen to go to, add a new screen where the survey will go. When you click the Add Screen... button above the viewer, a pop-up will prompt you to name the new screen. In this case, we have named the screen RunSurvey since this is where we will post the survey questions.

4.6 Since you just created RunSurvey, the viewer box will display the screen for RunSurvey, which is still blank. Since we are not done manipulating the code block from Step 4.4, go to the screen drop-down menu and switch back to Screen1. Last, switch back from the Designer mode to Blocks mode..

4.7. Now, finish the code block from Step 4.5. In Blocks view, go to the Text menu and drag the first block (containing quotes with an empty text field in the middle) to the end of the do statement.

4.8. In the empty text field, type in RunSurvey. Your code block now reads: when StartSurveyButton is clicked, open another screen called RunSurvey. You have successfully programmed the Start Survey button to navigate to the survey you are about to create!

4.9Navigate to your new screen, RunSurvey and enter Designer Mode.


Design the user interface of the survey screen – this is the screen you pulled into the last step. You’ll input the components for two multiple choice questions and one text response. To complete the screen you’ll add two buttons SUBMIT and CANCEL and the SMS/Texting component.
5.1. Similar to the start screen, you now need to design the layout and components of your survey. For this screen, there are going to be more than two components, so you can take advantage of the layout tools on the left hand toolbar. These layout tools act as containers where multiple components can be placed and arranged within. Start your first container layout by dragging in the Vertical Alignment onto the screen. Similar to the above steps, in the Properties toolbar on the right, change the "width" to Fill Parent. Additionally, rename the VerticalArrangment1 component in the components organizer to Question 1.


5.2 In the Palette toolbar, drag in a Label and three (3) CheckBox components into the viewer. Make sure to drag them into the container (Question_1) you just created. If you've done this correctly, you will see these four components show up under Question_1 in the components organizer.

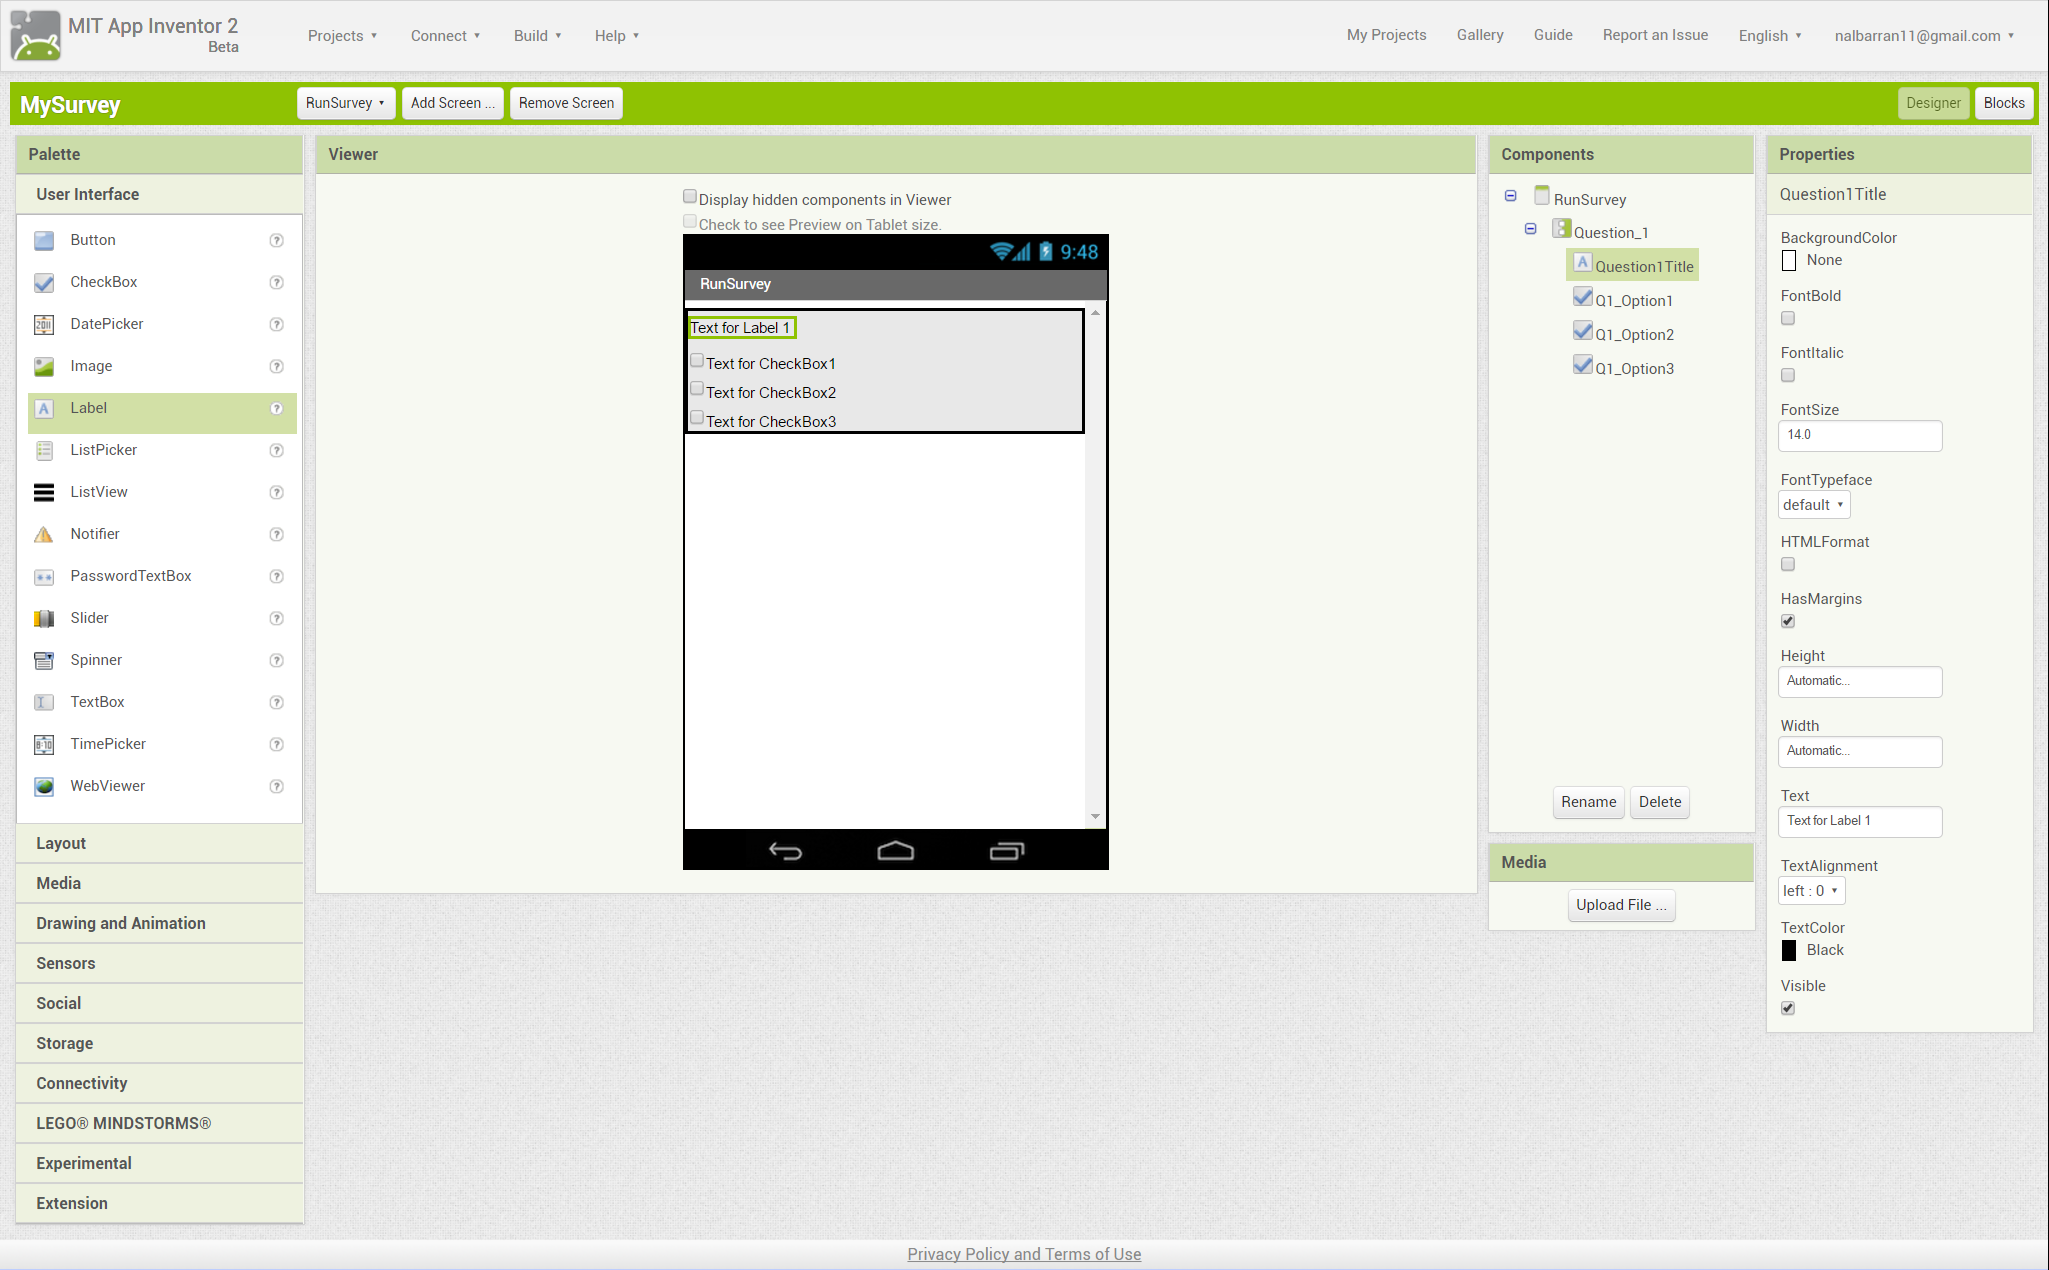
5.3 As you did in Step 3.3, change the text for each of the components you just added using the properties bar. Additionally, rename each of the components in the component organizer.

5.4 Now that your first question is added, it's time to add a second question. Repeat Steps 5.2 + 5.3 and create a second question container. Your screen should look like the figure on the right when you're done.


5.5 To add the third question, repeat Steps 5.2 + 5.3 once more. This time, instead of adding three CheckBox components, add a TextBox instead. Your screen should look like this:

5.6 To finish off the three question survey, you need to add two buttons to the bottom. One button to Submit the survey and one to Cancel. Follow Steps 19 + 20 again, this time using a HorizontalArrangement from the layout tab and two Buttons instead of the text boxes. Make sure to use the properties tab to change the button text and position. For the Submit button, you can change the background color of the button to stick out. Last, rename the components in the component organizer. Your screen should look like this:

5.7 The last component to the survey to add is the ability to send the results via text message once the submit button is clicked. Go to the Social tab in the Palette and drag the Texting component onto the viewer screen.

5.7 Note on the worksheet if you would like to add additional types of survey questions into your app. You can add these features in future iterations.

We'll now program the logic at the end of the survey for two paths, CANCEL and SUBMIT, triggered by button taps. CANCEL will return to the welcome screen. SUBMIT is a bit more complicated as we need to aggregate the responses for each question and package to send over text using a return variable. We’ll walk through this step by step!
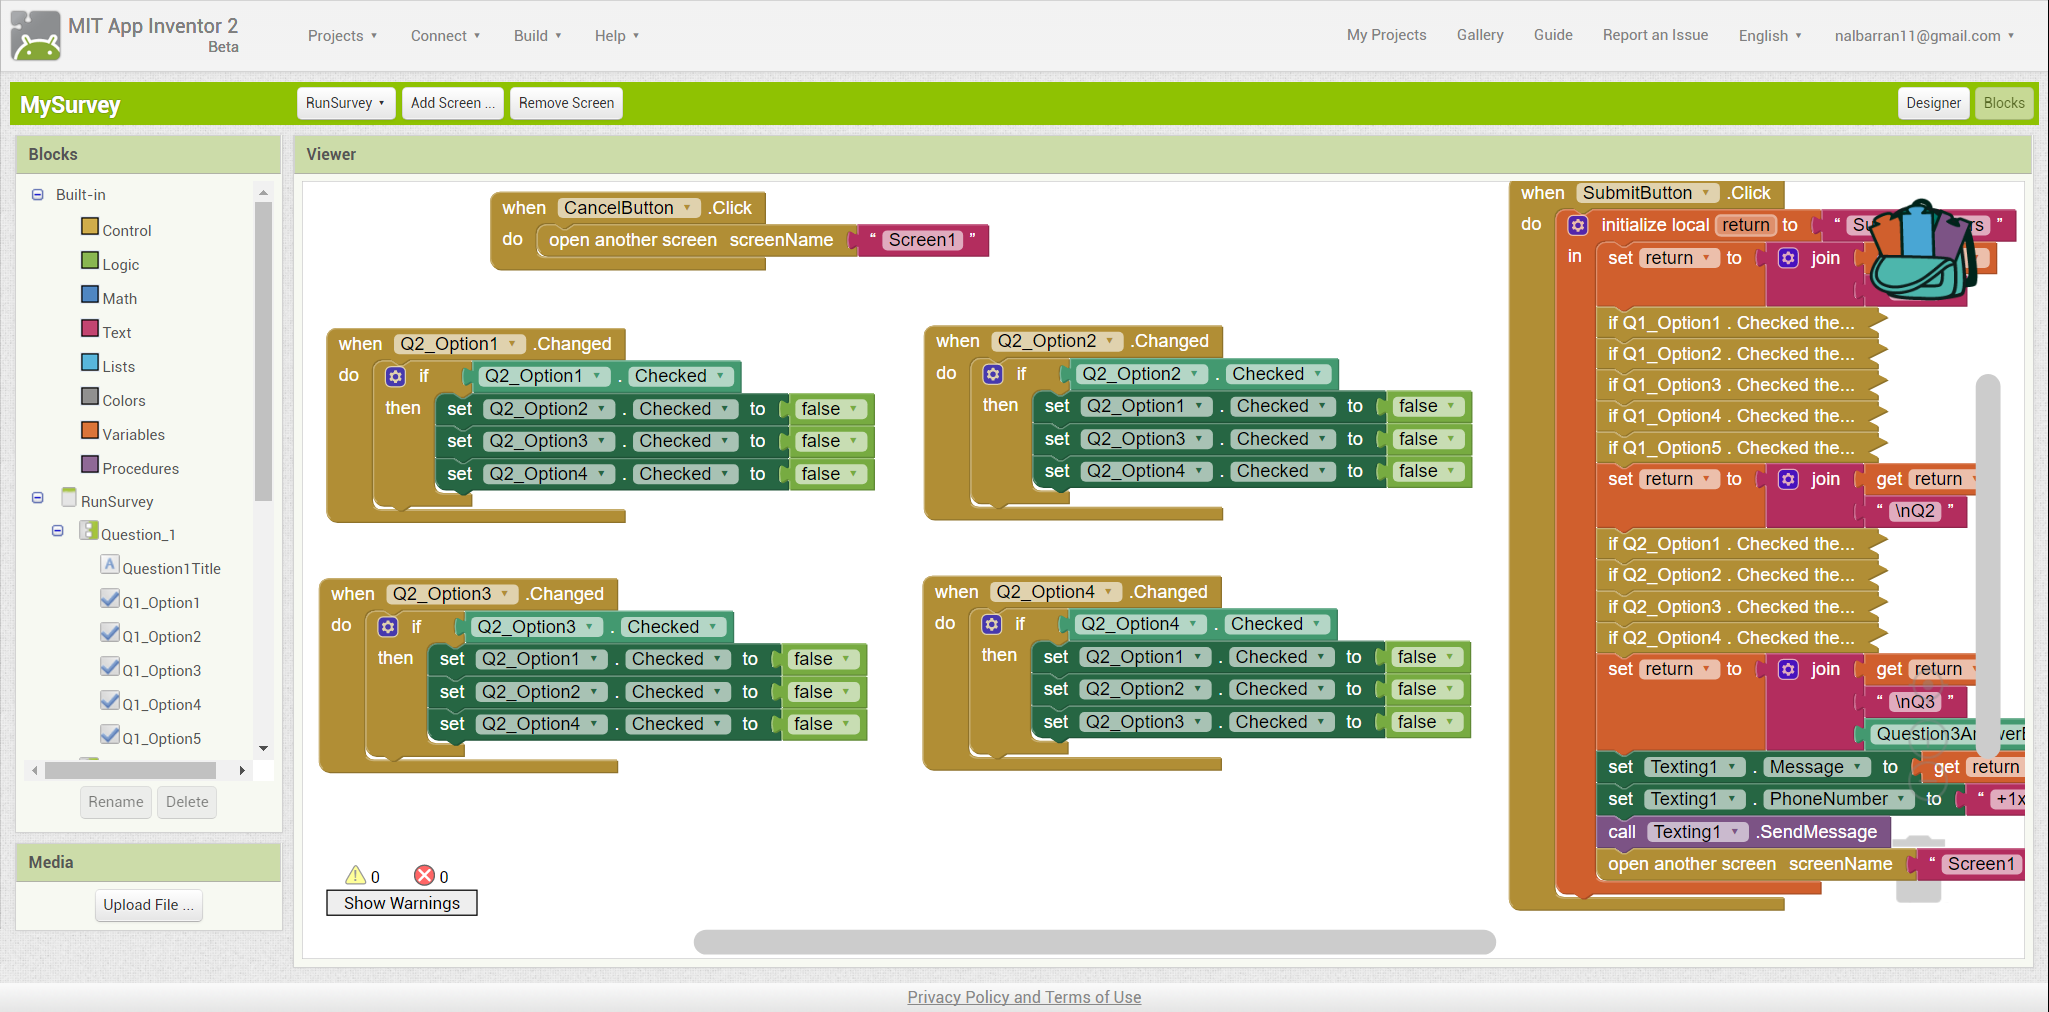
6.1 Go back to Blocks Mode. This time, repeat Steps 14-16 for the Cancel button instead of the StartSurvey Button. Set the Cancel button so that when it is clicked, it returns back to the start/welcome screen (Screen1).


6.2 Now, we’ll program the Submit button. Drag in the yellow block that says “when SubmitButton is clicked, do ____”
6.3 Set your first variable, drag in the orange block that says “initialize local _____ to ______ in _______” into the yellow block from Step 26. Change the name of the variable to return. This block will be used to house all of the answer submission for the survey.

6.4 Grab the light purple box with open quotations from the Text menu. Place this after to and give it the name, Survey Answers.

6.5 From the Variables menu, grab the orange block that states “set ____ to”. This block will be used to set the value of the return variable that was created above so fill in the name as return. From the Text menu, drag in the light purple box that says Join. Next, drag the “get _____” Variable block and “_____” Text block and include them after Join as shown in the picture below.

6.6 Next, program each of the check boxes for question 1. For each check box, an “if ____, then _____” code block will be used. Find these under the Control menu and add 5 to the viewer (one for each check box in question 1).

6.7 Since you want to know when the check box is clicked (that answer was chosen by the user), click on the Question1 options in the left hand side and drag over the code block for when they are checked.

6.8 Follow Step 6.5, add the corresponding code blocks to each If-Then conditional statement for the 5 Question 1 options.

6.9 Since the code block is getting pretty big, you can right click on the 5 If-Then blocks to collapse them.

6.10 Repeat Steps 6.5 - 6.9 for Question 2, making sure to use the text for those answers (Daily, Weekly, Monthly, Constant) instead of the pain types.


6.11 To set up the code block for the third question, follow Step 6.5.
6.12 This time, click the Settings icon in the join block.

6.13 In the Join Settings, drag a third String (from the left into the right Join block). You should see the Join block expand to be able to hold three options.

6.14 Add the Text option from the Question3TextBox menu. This will grab the text that the user inputs in the text field for the third survey question.


In this tutorial, all survey responses will go to the same phone number via text message. We’ll now pull in the specific text functions in Block Mode to make this happen.
7.1. Under the Texting1 menu, drag in the Message and Phone Number blocks. These blocks will be used to set the phone number that receives the survey results (which will be the Message that gets sent).

7.2 From the Variables menu, drag the “get _____” block (fill in return as the text) as the message to send. From the Text menu, drag the “___” block next to PhoneNumber. In this text block, input the 10 digit phone number to receive the responses (include 1 for the international code). Under Texting1, select the purple SendMessage block and drag it into the viewer.
7.3 Note on your worksheet if you would like to send the survey responses via a different communication tool (such as email) or if you would like the user to chose the phone number to send the survey results.

We’ll change the functionality of the multiple choice questions so that you can only check one of the boxes. This is done by including the logic that says if 1 is checked then 2, 3, 4 cannot be checked.
8.1 From the left menu, add the Clicked code block for each option into the viewer.

8.2 For each Clicked code block, add an If-Then block from the Controls menu. For the If part of the conditional, add the Clicked code block for that option.

8.3 Under the Then part of each conditional statement, add the code block "set _____, Check to ______" for the other options. For example, under Option1, include statements for Options 2,3, and 4 as part of the Then statement. For Option2, include statements for Options 1, 3, and 4...etc.


8.4 Under the green Logic menu, locate the False statement. Set each of the Checked to statements to False. Each of these 4 code blocks now says: If "a" option is checked, set the remaining options ("b", "c", and "d") to False (unchecked). Your screen should now look like this:

If you have an android phone, test your app using the App Inventor Companion app to download the packaged blocks on your phone.
9.1 Switch back to Designer Mode and change the viewer to the RunSurvey screen. On the right, under the Properties bar, check the Scrollable box. This will allow the user to scroll up and down on the survey page.

9.2 Make sure you have the AppInventor 2 Companion app on your Android device. If you do not have this, follow this link: http://appinventor.mit.edu/explore/ai2/setup-device-wifi.html
9.3 In the project workspace, locate the Connect menu in the top left. Click on AI Companion to open a pop-up window that will contain the information to connect to your newly designed app!

9.4 Open the AI2 Companion app on your mobile device. Either enter the 6 digit code or scan the QR code. Your survey app should now be open on your mobile device. Complete the survey, hit Submit, and the survey results will be sent to the phone you input in Step 40.

9.5 Every time you close the app on your phone, you will need to go back to the Connect menu in the project workspace and click Reset Connection.